
Hey teacher friend, you know the sound: a small hand waving in the air, an urgent whisper, a request that slices your lesson in two.

- “Can I go to the bathroom?”
- “Can I get water?”
- “I need a tissue!”
- “My pencil is broken!”
In a kindergarten or first grade classroom, that loop can hit every few minutes. Each request is small on its own. Stack them together and they break your lesson flow, pull your attention in ten directions, and quietly drain you by noon.
Enter: classroom hand signals.
These silent, simple gestures let students ask for what they need without raising a hand, calling out, or stopping your teaching. And the best part? They work with five- and six-year-olds from the very first week.
What Are Classroom Hand Signals?
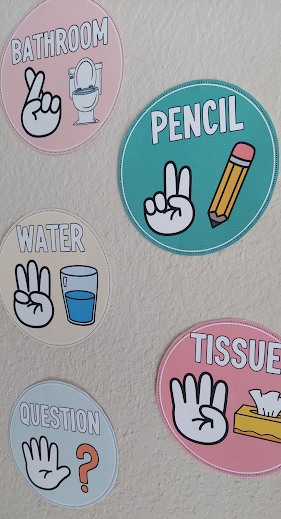
Classroom hand signals are a shared set of non verbal cues your students use to tell you a need at a glance. Crossed fingers means “bathroom.” Three fingers means “water.” One finger means “question.” A pinched nose means “tissue.”
No words. No waiting. No interruption. Just a quick gesture and a nod from you, and the lesson keeps rolling.
The key? Your students learn to manage their own needs while your teaching flow stays intact.
Why Hand Signals Work in a K-1 Classroom
For classroom management in kindergarten and first grade, few routines do more heavy lifting. And the beauty of hand signals in the classroom? They cost zero prep and zero extra materials. Here is why they work so well:
- They cut interruptions. A silent gesture takes two seconds. A call-out takes a full stop.
- They protect lesson flow. Read-alouds, whole-group lessons, and transitions keep moving because students never have to wait for permission to speak.
- They build independence. Students learn to check their own needs and use the right signal, which is real self-regulation practice.
- They give quiet students a voice. A shy child who will never call out will happily flash crossed fingers.
- They work in silent moments. Testing, library time, and quiet work still let students communicate.
Hand signals are also one of those classroom routines and procedures that pay off from day one. The earlier you teach them, the fewer interruptions you retrain later.
Want more ideas that hold up with real five- and six-year-olds? These kindergarten classroom management strategies pair perfectly with a hand-signal routine.
The Starter Set of Hand Signals
Start small. You do not need ten signals on day one. This starter set covers the requests K-1 students make the most:
- Bathroom: crossed fingers
- Water: three fingers up
- Question: one finger up
- Tissue: pinched nose
- Pencil: wiggling fingers
Pick gestures that look clearly different from each other, and keep the same set all year. If a signal means the same thing every single day, students trust it.
How to Teach Hand Signals in Week One

Week one is your window. Teach the signals before the calling-out habit ever forms:
- Introduce three or four signals on day one. More than that overwhelms five-year-olds.
- Model each one slowly. Say the words as you show the gesture: “Three fingers means I need water.”
- Play a practice game. Call out a need and have students show the signal. “Show me bathroom. Show me question. Show me water.” Make it fast and a little silly, and repeat it for a few minutes each morning.
- Put the visuals where everyone can see them. Hang the posters by your teaching spot and near the carpet so the signals are always in view. To match your classroom theme, grab a set of editable hand signal posters and customize the wording to your exact signals.
- Use the signals yourself. Every time you nod at a signal, you are teaching. Consistency is the whole trick.
- Keep practicing daily in week one. By Friday, the gestures should feel automatic.
Troubleshooting: Common Hand Signal Pitfalls
Hand signals are simple, but they do fail when the details slip. Here is what to watch for:
- Too many signals too fast. Add one or two per week instead of dumping the whole set on day one.
- Signals that look alike. Crossed fingers and three fingers are easy to confuse from across the room. Choose visually distinct gestures.
- Signals that get ignored. When a student signals, respond quickly, even with a nod or a thumbs-up. If a signal never gets an answer, students quietly stop using it and go back to calling out.
- Posters out of sight. If students cannot see the visuals, they cannot use them. Keep them front and center.
- Bathroom every ten minutes. Pair signals with your normal bathroom routine, like only during transitions or with your go-ahead. The signal communicates the need; your routine sets the timing.
And if making posters is not your thing, ready-made classroom hand signal posters are a quick print-and-go option that looks polished in minutes.
Frequently Asked Questions
When should I introduce hand signals?
Teach them in week one, ideally on day one or two. Five- and six-year-olds pick up routines fastest before other habits, like calling out, ever take root. Five minutes of practice a day is plenty.
How many hand signals should I teach at once?
Start with three or four: bathroom, water, question, and tissue. Add pencil, answer, or anything else once the first set feels automatic.
What if my students forget the signals?
Totally normal, especially in the first weeks. Point to the poster, show the gesture again, and practice. Treat it as a quick reteach, not a failure.
Classroom hand signals will not erase every interruption, and that is okay. What they will do is cut the noise, protect your lesson flow, and hand your students a little more independence every single day.
And honestly, the quieter your mornings get, the more you will wonder how you taught without them.
Happy signaling, teacher friend!
-Vanessa